本文主要对基于XML和基于注解配置声明式事务的执行过程进行介绍,因为Spring的事务是基于AOP的,所以最好了解一些AOP相关的基础内容,下面我们就开始进入正文
配置使用
我们使用一个功能,首先就是需要配置,这里我们写一个基于Mybatis的配置,dataSource相关的配置都忽略,直接看事务相关的配置
1
2
3
4
5
6
|
<bean id="transactionManager" class="org.springframework.jdbc.datasource.DataSourceTransactionManager">
<constructor-arg ref="dataSource" />
</bean>
<tx:annotation-driven transaction-manager="transactionManager" />
|
这样配置后,在对应的方法上添加@Transactional注解即可启用事务,非常方便
原理
Spring的事务配置和使用是很简单的,但是我们一定不会满足于此,接下面我们就来分析一下上面这几行配置如何起到这么大的作用
TransactionManager
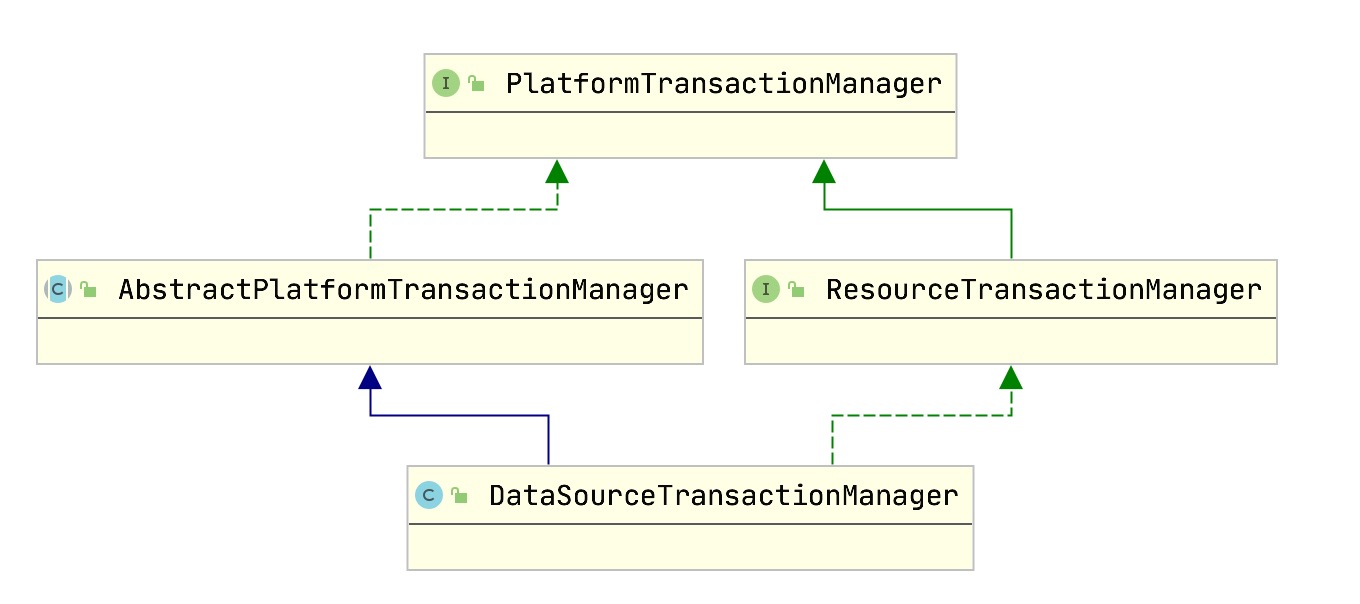
先来看下 DataSourceTransactionManager 这个类的基础关系

这个关系还是比较简单的,一个接口PlatformTransactionManager, 有接口就基本会有一个抽象类 AbstractPlatformTransactionManager
看下接口的定义
1
2
3
4
5
6
7
8
9
|
public interface PlatformTransactionManager {
TransactionStatus getTransaction(TransactionDefinition definition) throws TransactionException;
void commit(TransactionStatus status) throws TransactionException;
void rollback(TransactionStatus status) throws TransactionException;
}
|
其中几个类的作用我们需要明确一下
TransactionDefinition
1
2
3
4
5
6
7
8
9
10
11
12
13
14
15
16
17
18
19
20
21
22
23
24
25
26
27
28
29
30
31
32
|
public interface TransactionDefinition {
int PROPAGATION_REQUIRED = 0;
int PROPAGATION_SUPPORTS = 1;
int PROPAGATION_MANDATORY = 2;
int PROPAGATION_REQUIRES_NEW = 3;
int PROPAGATION_NOT_SUPPORTED = 4;
int PROPAGATION_NEVER = 5;
int PROPAGATION_NESTED = 6;
int ISOLATION_DEFAULT = -1;
int ISOLATION_READ_UNCOMMITTED = Connection.TRANSACTION_READ_UNCOMMITTED;
int ISOLATION_READ_COMMITTED = Connection.TRANSACTION_READ_COMMITTED;
int ISOLATION_REPEATABLE_READ = Connection.TRANSACTION_REPEATABLE_READ;
int ISOLATION_SERIALIZABLE = Connection.TRANSACTION_SERIALIZABLE;
int TIMEOUT_DEFAULT = -1;
int getPropagationBehavior();
int getIsolationLevel();
int getTimeout();
boolean isReadOnly();
String getName();
}
|
TransactionStatus

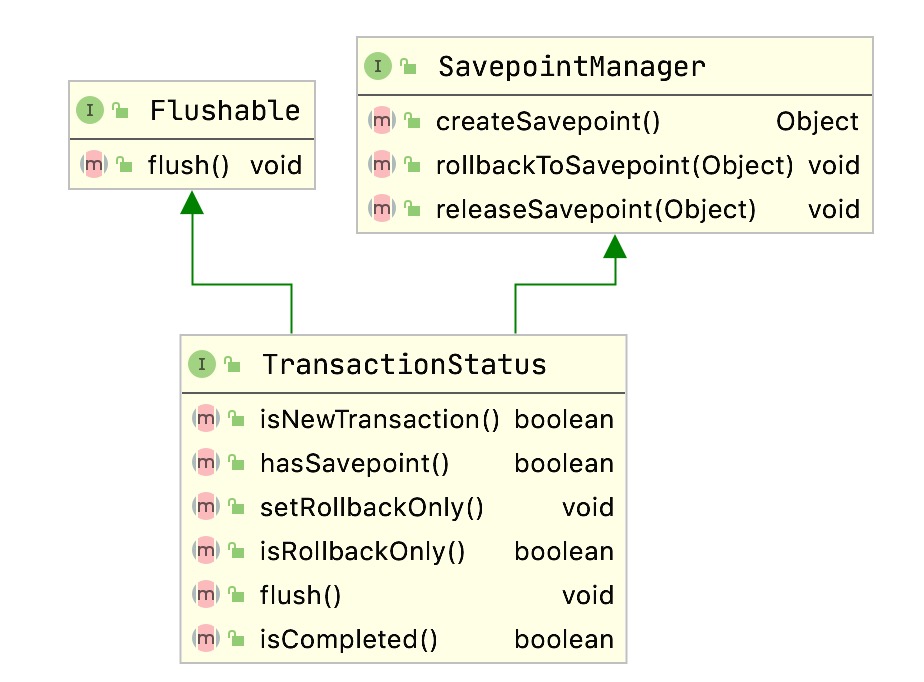
TransactionStatus中主要是保存事务的状态,以及一些保存点(用于事务嵌套回滚等)的信息
1
2
3
4
5
6
|
protected abstract Object doGetTransaction() throws TransactionException;
protected abstract void doBegin(Object transaction, TransactionDefinition definition) throws TransactionException;
protected abstract void doCommit(DefaultTransactionStatus status) throws TransactionException
protected abstract void doRollback(DefaultTransactionStatus status) throws TransactionException;
|
TransactionManager中用于定义协议,通用的实现基本都在对应的抽象类中(可以理解为模板方法模式),在抽象类中定义模板方法,具体子类负责实现。
AbstractPlatformTransactionManager主要封装了传递规则等的处理逻辑,这里就先不进入具体分析了,大家有兴趣可以去看下对应的源码
DataSourceTransactionManager
有了抽象类封装基本骨架,子类实现起来就比较简单了,我们挑几个方法看一下就好
1
2
3
4
5
6
7
8
9
10
11
12
13
14
15
16
17
18
19
20
21
22
23
24
25
26
27
28
29
30
31
32
33
34
35
36
37
38
39
40
41
42
43
44
45
46
47
48
49
50
51
52
53
54
55
56
57
58
59
60
61
62
63
64
65
66
67
68
69
70
71
72
73
74
75
76
| public class DataSourceTransactionManager extends AbstractPlatformTransactionManager
implements ResourceTransactionManager, InitializingBean {
@Override
protected Object doGetTransaction() {
DataSourceTransactionObject txObject = new DataSourceTransactionObject();
txObject.setSavepointAllowed(isNestedTransactionAllowed());
ConnectionHolder conHolder = (ConnectionHolder) TransactionSynchronizationManager.getResource(this.dataSource);
txObject.setConnectionHolder(conHolder, false);
return txObject;
}
@Override
protected boolean isExistingTransaction(Object transaction) {
DataSourceTransactionObject txObject = (DataSourceTransactionObject) transaction;
return (txObject.getConnectionHolder() != null && txObject.getConnectionHolder().isTransactionActive());
}
@Override
protected void doBegin(Object transaction, TransactionDefinition definition) {
DataSourceTransactionObject txObject = (DataSourceTransactionObject) transaction;
Connection con = null;
try {
if (txObject.getConnectionHolder() == null ||
txObject.getConnectionHolder().isSynchronizedWithTransaction()) {
Connection newCon = this.dataSource.getConnection();
}
txObject.setConnectionHolder(new ConnectionHolder(newCon), true);
txObject.getConnectionHolder().setSynchronizedWithTransaction(true);
con = txObject.getConnectionHolder().getConnection();
Integer previousIsolationLevel = DataSourceUtils.prepareConnectionForTransaction(con, definition);
txObject.setPreviousIsolationLevel(previousIsolationLevel);
if (con.getAutoCommit()) {
txObject.setMustRestoreAutoCommit(true);
con.setAutoCommit(false);
}
prepareTransactionalConnection(con, definition);
txObject.getConnectionHolder().setTransactionActive(true);
int timeout = determineTimeout(definition);
if (timeout != TransactionDefinition.TIMEOUT_DEFAULT) {
txObject.getConnectionHolder().setTimeoutInSeconds(timeout);
}
if (txObject.isNewConnectionHolder()) {
TransactionSynchronizationManager.bindResource(getDataSource(), txObject.getConnectionHolder());
}
} catch (Throwable ex) {
}
}
@Override
protected void doCommit(DefaultTransactionStatus status) {
DataSourceTransactionObject txObject = (DataSourceTransactionObject) status.getTransaction();
Connection con = txObject.getConnectionHolder().getConnection();
try {
con.commit();
} catch (SQLException ex) {
throw new TransactionSystemException("Could not commit JDBC transaction", ex);
}
}
}
|
到这里算是事务管理器的部分简单整理完了,其实就是Spring提供了一套事务功能的基本抽象(其中包括事务传递行为),然后由各个子类进行具体的实现
同时Spring使用基于 ThreadLocal 的 TransactionSynchronizationManager 进行事务资源的管理,如连接等
1
2
3
4
5
6
7
8
9
10
11
12
13
14
15
16
17
18
19
20
21
22
23
24
25
26
27
28
29
30
31
32
33
34
35
36
37
38
39
40
41
42
43
44
|
public abstract class TransactionSynchronizationManager {
private static final ThreadLocal<Map<Object, Object>> resources =
new NamedThreadLocal<Map<Object, Object>>("Transactional resources");
private static final ThreadLocal<Set<TransactionSynchronization>> synchronizations =
new NamedThreadLocal<Set<TransactionSynchronization>>("Transaction synchronizations");
private static final ThreadLocal<String> currentTransactionName =
new NamedThreadLocal<String>("Current transaction name");
private static final ThreadLocal<Boolean> currentTransactionReadOnly =
new NamedThreadLocal<Boolean>("Current transaction read-only status");
private static final ThreadLocal<Integer> currentTransactionIsolationLevel =
new NamedThreadLocal<Integer>("Current transaction isolation level");
private static final ThreadLocal<Boolean> actualTransactionActive =
new NamedThreadLocal<Boolean>("Actual transaction active");
public static boolean hasResource(Object key) {
Object actualKey = TransactionSynchronizationUtils.unwrapResourceIfNecessary(key);
Object value = doGetResource(actualKey);
return (value != null);
}
private static Object doGetResource(Object actualKey) {
Map<Object, Object> map = resources.get();
if (map == null) {
return null;
}
Object value = map.get(actualKey);
return value;
}
public static void bindResource(Object key, Object value) throws IllegalStateException {
Object actualKey = TransactionSynchronizationUtils.unwrapResourceIfNecessary(key);
Assert.notNull(value, "Value must not be null");
Map<Object, Object> map = resources.get();
if (map == null) {
map = new HashMap<Object, Object>();
resources.set(map);
}
Object oldValue = map.put(actualKey, value);
}
}
|
编程事事务
有了以上的基础后,我们就可以使用编程式的方式来使用事务了,代码如下:
1
2
3
4
5
6
7
8
9
10
11
12
13
14
15
16
17
18
19
20
21
|
DriverManagerDataSource dataSource = new DriverManagerDataSource("jdbc:mysql://xx", "root", "root");
PlatformTransactionManager transactionManager = new DataSourceTransactionManager(dataSource);
JdbcTemplate jdbcTemplate = new JdbcTemplate(dataSource);
DefaultTransactionDefinition def = new DefaultTransactionDefinition();
def.setTimeout(5);
TransactionStatus status = transactionManager.getTransaction(def);
try {
Integer integer = jdbcTemplate.queryForObject("select count(*) from hero", Integer.class);
System.out.println("count is: " + integer);
transactionManager.commit(status);
} catch (DataAccessException e) {
transactionManager.rollback(status);
throw e;
}
|
其中jdbcTemplate最终会调用org.springframework.jdbc.datasource.DataSourceUtils#doGetConnection来获取连接资源
1
2
3
4
5
6
7
8
9
10
11
12
13
14
15
16
17
18
19
20
21
22
23
24
25
26
27
28
29
30
31
32
| public static Connection doGetConnection(DataSource dataSource) throws SQLException {
ConnectionHolder conHolder = (ConnectionHolder) TransactionSynchronizationManager.getResource(dataSource);
if (conHolder != null && (conHolder.hasConnection() || conHolder.isSynchronizedWithTransaction())) {
conHolder.requested();
if (!conHolder.hasConnection()) {
logger.debug("Fetching resumed JDBC Connection from DataSource");
conHolder.setConnection(dataSource.getConnection());
}
return conHolder.getConnection();
}
logger.debug("Fetching JDBC Connection from DataSource");
Connection con = dataSource.getConnection();
if (TransactionSynchronizationManager.isSynchronizationActive()) {
ConnectionHolder holderToUse = conHolder;
if (holderToUse == null) {
holderToUse = new ConnectionHolder(con);
}
else {
holderToUse.setConnection(con);
}
holderToUse.requested();
TransactionSynchronizationManager.registerSynchronization(
new DataSourceUtils.ConnectionSynchronization(holderToUse, dataSource));
holderToUse.setSynchronizedWithTransaction(true);
if (holderToUse != conHolder) {
TransactionSynchronizationManager.bindResource(dataSource, holderToUse);
}
}
return con;
}
|
注解式声明事务
介绍完DataSourceTransactionManager, 我们看下Spring是如何通过注解来实现使用事务的,目前我们配置的内容只有<tx:annotation-driven transaction-manager="transactionManager" />, 那么我们就从这里入手
Spring处理自定义标签是使用特定的handler进行的,所以我们可以根据命名空间直接找到TxNamespaceHandler
1
2
3
4
5
6
7
8
| public class TxNamespaceHandler extends NamespaceHandlerSupport {
@Override
public void init() {
registerBeanDefinitionParser("advice", new TxAdviceBeanDefinitionParser());
registerBeanDefinitionParser("annotation-driven", new AnnotationDrivenBeanDefinitionParser());
registerBeanDefinitionParser("jta-transaction-manager", new JtaTransactionManagerBeanDefinitionParser());
}
}
|
找到对应的Bean解析器 AnnotationDrivenBeanDefinitionParser,进入
1
2
3
4
5
6
7
8
9
10
11
12
13
14
15
16
17
18
19
20
21
22
23
24
25
26
27
28
29
30
31
32
33
34
35
36
37
38
39
40
41
42
43
44
45
46
47
48
49
50
51
52
53
54
55
56
57
58
59
60
61
62
63
64
| class AnnotationDrivenBeanDefinitionParser implements BeanDefinitionParser {
@Override
public BeanDefinition parse(Element element, ParserContext parserContext) {
registerTransactionalEventListenerFactory(parserContext);
String mode = element.getAttribute("mode");
if ("aspectj".equals(mode)) {
registerTransactionAspect(element, parserContext);
}
else {
AopAutoProxyConfigurer.configureAutoProxyCreator(element, parserContext);
}
return null;
}
private static class AopAutoProxyConfigurer {
public static void configureAutoProxyCreator(Element element, ParserContext parserContext) {
AopNamespaceUtils.registerAutoProxyCreatorIfNecessary(parserContext, element);
String txAdvisorBeanName = TransactionManagementConfigUtils.TRANSACTION_ADVISOR_BEAN_NAME;
if (!parserContext.getRegistry().containsBeanDefinition(txAdvisorBeanName)) {
Object eleSource = parserContext.extractSource(element);
RootBeanDefinition sourceDef = new RootBeanDefinition("org.springframework.transaction.annotation.AnnotationTransactionAttributeSource");
sourceDef.setSource(eleSource);
sourceDef.setRole(BeanDefinition.ROLE_INFRASTRUCTURE);
String sourceName = parserContext.getReaderContext().registerWithGeneratedName(sourceDef);
RootBeanDefinition interceptorDef = new RootBeanDefinition(TransactionInterceptor.class);
interceptorDef.setSource(eleSource);
interceptorDef.setRole(BeanDefinition.ROLE_INFRASTRUCTURE);
registerTransactionManager(element, interceptorDef);
interceptorDef.getPropertyValues().add("transactionAttributeSource", new RuntimeBeanReference(sourceName));
String interceptorName = parserContext.getReaderContext().registerWithGeneratedName(interceptorDef);
RootBeanDefinition advisorDef = new RootBeanDefinition(BeanFactoryTransactionAttributeSourceAdvisor.class);
advisorDef.setSource(eleSource);
advisorDef.setRole(BeanDefinition.ROLE_INFRASTRUCTURE);
advisorDef.getPropertyValues().add("transactionAttributeSource", new RuntimeBeanReference(sourceName));
advisorDef.getPropertyValues().add("adviceBeanName", interceptorName);
if (element.hasAttribute("order")) {
advisorDef.getPropertyValues().add("order", element.getAttribute("order"));
}
parserContext.getRegistry().registerBeanDefinition(txAdvisorBeanName, advisorDef);
CompositeComponentDefinition compositeDef = new CompositeComponentDefinition(element.getTagName(), eleSource);
compositeDef.addNestedComponent(new BeanComponentDefinition(sourceDef, sourceName));
compositeDef.addNestedComponent(new BeanComponentDefinition(interceptorDef, interceptorName));
compositeDef.addNestedComponent(new BeanComponentDefinition(advisorDef, txAdvisorBeanName));
parserContext.registerComponent(compositeDef);
}
}
}
}
|
首先我们要看一下AopNamespaceUtils.registerAutoProxyCreatorIfNecessary(parserContext, element),这个是很关键的,Spring的事务是基于AOP的,所以这里注册了一个AOP的一个自动发现并创建代理类的Bean, 我们跟进代码会发现注册的BeanInfrastructureAdvisorAutoProxyCreator,AdvisorAutoProxyCreator Bean是Spring AOP自动创建代理的关键,它实现了 BeanPostProcessor接口,并在每个Bean创建初始化前后,对满足条件的Bean进行替换代理
1
2
3
4
5
6
7
8
9
10
11
12
13
14
15
16
17
18
19
20
21
22
23
24
25
26
27
28
29
30
31
32
33
34
35
36
37
|
public Object postProcessAfterInitialization(Object bean, String beanName) throws BeansException {
if (bean != null) {
Object cacheKey = getCacheKey(bean.getClass(), beanName);
if (!this.earlyProxyReferences.contains(cacheKey)) {
return wrapIfNecessary(bean, beanName, cacheKey);
}
}
return bean;
}
protected Object wrapIfNecessary(Object bean, String beanName, Object cacheKey) {
if (beanName != null && this.targetSourcedBeans.contains(beanName)) {
return bean;
}
if (Boolean.FALSE.equals(this.advisedBeans.get(cacheKey))) {
return bean;
}
if (isInfrastructureClass(bean.getClass()) || shouldSkip(bean.getClass(), beanName)) {
this.advisedBeans.put(cacheKey, Boolean.FALSE);
return bean;
}
Object[] specificInterceptors = getAdvicesAndAdvisorsForBean(bean.getClass(), beanName, null);
if (specificInterceptors != DO_NOT_PROXY) {
this.advisedBeans.put(cacheKey, Boolean.TRUE);
Object proxy = createProxy(
bean.getClass(), beanName, specificInterceptors, new SingletonTargetSource(bean));
this.proxyTypes.put(cacheKey, proxy.getClass());
return proxy;
}
this.advisedBeans.put(cacheKey, Boolean.FALSE);
return bean;
}
|
接着来看下 TransactionAttributeSourceAdvisor,AOP里面的关键Advisor中包含两个职责,一个用来匹配切点的Pointcut, 还有一个用来增强的 Advice,在这里分别依赖 AnnotationTransactionAttributeSource 和 TransactionInterceptor 来实现
规则匹配- 基于AnnotationTransactionAttributeSource
先来看下基于 AnnotationTransactionAttributeSource 的匹配规则功能(已删除大部分代码)
1
2
3
4
5
6
7
8
9
10
11
12
13
14
15
16
17
18
19
20
21
22
23
24
|
public class TransactionAttributeSourceAdvisor extends AbstractPointcutAdvisor {
private final TransactionAttributeSourcePointcut pointcut = new TransactionAttributeSourcePointcut() {
@Override
protected TransactionAttributeSource getTransactionAttributeSource() {
return (transactionInterceptor != null ? transactionInterceptor.getTransactionAttributeSource() : null);
}
};
}
abstract class TransactionAttributeSourcePointcut extends StaticMethodMatcherPointcut implements Serializable {
@Override
public boolean matches(Method method, Class<?> targetClass) {
if (TransactionalProxy.class.isAssignableFrom(targetClass)) {
return false;
}
TransactionAttributeSource tas = getTransactionAttributeSource();
return (tas == null || tas.getTransactionAttribute(method, targetClass) != null);
}
}
|
增强实现- 基于TransactionInterceptor
直接看起代码方法invoke
1
2
3
4
5
6
7
8
9
10
11
12
13
14
15
16
17
18
19
20
21
22
23
24
25
26
27
28
29
30
31
32
33
34
35
36
37
38
39
40
41
42
43
44
45
46
47
48
49
50
51
52
53
54
55
56
57
58
59
60
61
62
63
64
65
66
67
68
69
70
71
72
73
74
75
76
77
|
@Override
public Object invoke(final MethodInvocation invocation) throws Throwable {
Class<?> targetClass = (invocation.getThis() != null ? AopUtils.getTargetClass(invocation.getThis()) : null);
return invokeWithinTransaction(invocation.getMethod(), targetClass, new TransactionAspectSupport.InvocationCallback() {
@Override
public Object proceedWithInvocation() throws Throwable {
return invocation.proceed();
}
});
}
protected Object invokeWithinTransaction(Method method, Class<?> targetClass, final TransactionAspectSupport.InvocationCallback invocation)
throws Throwable {
final TransactionAttribute txAttr = getTransactionAttributeSource().getTransactionAttribute(method, targetClass);
final PlatformTransactionManager tm = determineTransactionManager(txAttr);
final String joinpointIdentification = methodIdentification(method, targetClass, txAttr);
if (txAttr == null || !(tm instanceof CallbackPreferringPlatformTransactionManager)) {
TransactionAspectSupport.TransactionInfo txInfo = createTransactionIfNecessary(tm, txAttr, joinpointIdentification);
Object retVal = null;
try {
retVal = invocation.proceedWithInvocation();
}
catch (Throwable ex) {
completeTransactionAfterThrowing(txInfo, ex);
throw ex;
}
finally {
cleanupTransactionInfo(txInfo);
}
commitTransactionAfterReturning(txInfo);
return retVal;
}
}
protected TransactionAspectSupport.TransactionInfo createTransactionIfNecessary(
PlatformTransactionManager tm, TransactionAttribute txAttr, final String joinpointIdentification) {
TransactionStatus status = null;
if (txAttr != null) {
if (tm != null) {
status = tm.getTransaction(txAttr);
}
}
return prepareTransactionInfo(tm, txAttr, joinpointIdentification, status);
}
protected void completeTransactionAfterThrowing(TransactionAspectSupport.TransactionInfo txInfo, Throwable ex) {
if (txInfo != null && txInfo.hasTransaction()) {
if (txInfo.transactionAttribute.rollbackOn(ex)) {
try {
txInfo.getTransactionManager().rollback(txInfo.getTransactionStatus());
}
catch (Error err) {
}
}
}
}
protected void commitTransactionAfterReturning(TransactionAspectSupport.TransactionInfo txInfo) {
if (txInfo != null && txInfo.hasTransaction()) {
txInfo.getTransactionManager().commit(txInfo.getTransactionStatus());
}
}
|
注解实现的原理基本就是上面的这些了,总结一下就是
- 首先启用AOP的自动代理创建功能
- 创建Advisor, 使用 AnnotationTransactionAttributeSource 实现 pointcut的功能,通过方法注解匹配
- 使用TransactionInterceptor实现增强(Advice),其中包装业务逻辑,使用TransactionManager调用具体事务

