之前写过一篇mybatis-spring配置及使用 的文章,但是其中主要是偏使用的一些内容,这次我们就从根上来分析一下 mybatis配置及核心流程的功能实现,以及后续对它配置的一些优化、简化功能
mybatis为基于3.5.10版本的代码
最简核心配置
配置使用
首先需要进行mybatis的xml配置 mybatis-config.xml
1
2
3
4
5
6
7
8
9
10
11
12
13
14
15
16
17
18
19
20
21
22
23
24
<?xml version="1.0" encoding="UTF-8" ?> <!DOCTYPE configuration PUBLIC "-//mybatis.org//DTD Config 3.0//EN" "http://mybatis.org/dtd/mybatis-3-config.dtd" > <configuration > <environments default ="development" > <environment id ="development" > <transactionManager type ="JDBC" /> <dataSource type ="POOLED" > <property name ="driver" value ="com.mysql.cj.jdbc.Driver" /> <property name ="url" value ="jdbc:mysql://localhost:3306/test" /> <property name ="username" value ="root" /> <property name ="password" value ="root" /> </dataSource > </environment > </environments > <mappers > <mapper resource ="mapper/UserMapper.xml" /> </mappers > </configuration >
接下来进行mapper的配置,这里我们就随意举一个例子吧
1 2 3 4 5 6 7 8 public class UserDO { private Integer id; private String userName; private Integer userAge; }
1 2 3 4 5 6 7 8 9 10 11 12 13 14 15 16 17 18 <mapper namespace ="com.zavier.demo.mapper.UserMapper" > <resultMap id ="BaseResultMap" type ="com.zavier.demo.entity.UserDO" > <id column ="id" jdbcType ="INTEGER" property ="id" /> <result column ="user_name" jdbcType ="VARCHAR" property ="userName" /> <result column ="user_age" jdbcType ="INTEGER" property ="userAge" /> </resultMap > <insert id ="save" parameterType ="com.zavier.demo.entity.UserDO" > INSERT INTO t_user (user_name, user_age) VALUES (#{userName}, #{userAge}) </insert > <select id ="findById" parameterType ="java.lang.Integer" resultMap ="BaseResultMap" > SELECT id, user_name, user_age FROM t_user WHERE id = #{userId} </select > </mapper >
配置完成后就可以直接使用了
1 2 3 4 5 6 7 8 9 InputStream inputStream = Resources.getResourceAsStream("mybatis-config.xml" );SqlSessionFactory sessionFactory = new SqlSessionFactoryBuilder ().build(inputStream);SqlSession session = sessionFactory.openSession(true );UserDO user = session.selectOne("com.zavier.demo.mapper.UserMapper.findById" , 1 );
原理分析
创建SqlSessionFactory
接下来看一下上面这一段代码都做了什么事情,其中第一步就是构建SqlSessionFactory实例,这个跟进源码可以发现是使用的 XMLConfigBuilder 对 mybatis-config.xml 进行的解析,得到Configuration
1
2
XMLConfigBuilder parser = new XMLConfigBuilder (inputStream, environment, properties);Configuration configuration = parser.parse();
这个Configuration可以认为包含了mybatis的一切配置信息,包括其中的mapper.xml中的相关信息,在解析创建Configuration的过程中会使用XMLMapperBuilder对mapper.xml文件进行解析,并借助MapperBuilderAssistant 将每个 select|insert|update|delete 节点转换成 MappedStatement,并注册到 Configuration中
1
2
XMLMapperBuilder mapperParser = new XMLMapperBuilder (inputStream, configuration, resource, configuration.getSqlFragments());mapperParser.parse();
1 2 3 protected final Map<String, MappedStatement> mappedStatements =
这样在创建完 SqlSessionFactory 实例后,我们就可以得到一个包含全部配置的Configuration类,同时将数据库操作的节点注册到了其中的 mappedStatements,后续我们进行数据库操作就要依赖这些 mappedStatements
创建Session
创建session的代码如下
1 2 3 4 5 6 7 8 9 10 11 12 13 14 15 16 17 18 19 20 21 private SqlSession openSessionFromDataSource (ExecutorType execType, TransactionIsolationLevel level, boolean autoCommit) { Transaction tx = null ; try { final Environment environment = configuration.getEnvironment(); final TransactionFactory transactionFactory = getTransactionFactoryFromEnvironment(environment); tx = transactionFactory.newTransaction(environment.getDataSource(), level, autoCommit); final Executor executor = configuration.newExecutor(tx, execType); return new DefaultSqlSession (configuration, executor, autoCommit); } catch (Exception e) { closeTransaction(tx); throw ExceptionFactory.wrapException("Error opening session. Cause: " + e, e); } finally { ErrorContext.instance().reset(); } }
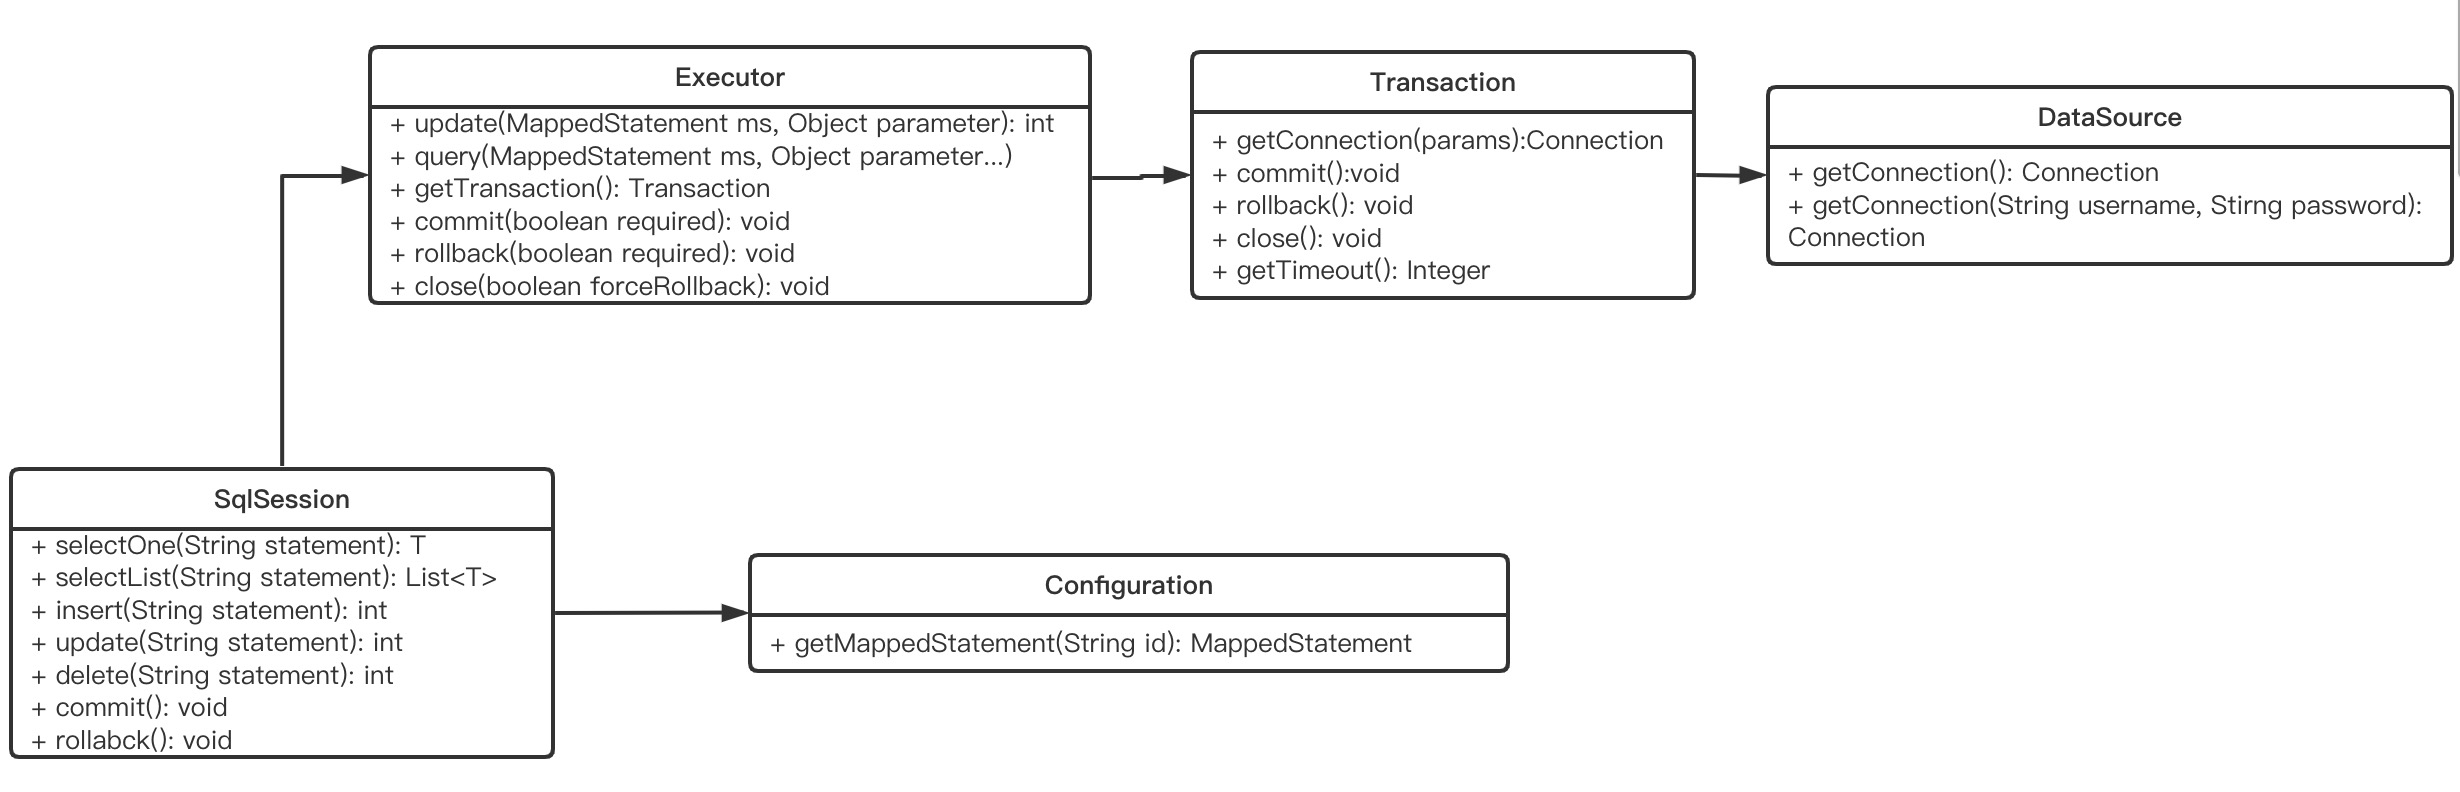
这几个类间的关系大致如下图
SqlSession查询
查询逻辑会进入到如下流程中
1 2 3 4 5 6 7 8 9 10 11 12 13 14 private <E> List<E> selectList (String statement, Object parameter, RowBounds rowBounds, ResultHandler handler) { try { MappedStatement ms = configuration.getMappedStatement(statement); return executor.query(ms, wrapCollection(parameter), rowBounds, handler); } catch (Exception e) { throw ExceptionFactory.wrapException("Error querying database. Cause: " + e, e); } finally { ErrorContext.instance().reset(); } }
接着进入Executor的执行流程
1 2 3 4 5 6 7 8 9 10 11 12 13 14 15 16 17 18 19 20 21 22 23 24 25 26 27 28 29 30 31 32 33 34 35 36 37 38 39 40 41 42 43 44 45 46 47 48 49 50 51 52 public <E> List<E> query (MappedStatement ms, Object parameter, RowBounds rowBounds, ResultHandler resultHandler) throws SQLException { BoundSql boundSql = ms.getBoundSql(parameter); CacheKey key = createCacheKey(ms, parameter, rowBounds, boundSql); return query(ms, parameter, rowBounds, resultHandler, key, boundSql); } public <E> List<E> doQuery (MappedStatement ms, Object parameter, RowBounds rowBounds, ResultHandler resultHandler, BoundSql boundSql) throws SQLException { Statement stmt = null ; try { Configuration configuration = ms.getConfiguration(); StatementHandler handler = configuration.newStatementHandler(wrapper, ms, parameter, rowBounds, resultHandler, boundSql); stmt = prepareStatement(handler, ms.getStatementLog()); return handler.query(stmt, resultHandler); } finally { closeStatement(stmt); } } private Statement prepareStatement (StatementHandler handler, Log statementLog) throws SQLException { Statement stmt; Connection connection = getConnection(statementLog); stmt = handler.prepare(connection, transaction.getTimeout()); handler.parameterize(stmt); return stmt; } protected Connection getConnection (Log statementLog) throws SQLException { Connection connection = transaction.getConnection(); if (statementLog.isDebugEnabled()) { return ConnectionLogger.newInstance(connection, statementLog, queryStack); } else { return connection; } }
1 2 3 4 5 6 7 8 public <E> List<E> query (Statement statement, ResultHandler resultHandler) throws SQLException { PreparedStatement ps = (PreparedStatement) statement; ps.execute(); return resultSetHandler.handleResultSets(ps); }
这样一次查询请求就执行完成了,整体路径如下
SqlSession 【传递MappedStatement和参数】
Executor【创建并使用StatementHandler查询并转换结果返回】
StatementHandler【使用TypeHandler及ResultSetHandler 处理参数及结果】
Mapper接口支持
之前我们的流程里面没有涉及到平时开发中最常用的Mapper接口,其实这个也确实不是必须的,但是如果使用
1 UserDO user = session.selectOne("com.zavier.demo.mapper.UserMapper.findById" , 1 );
这种方式进行查询还是不太方便,所以一般会使用单独的Mapper接口,调用对于的方法即可
配置使用
首先需要增加上对应的Mapper接口,注意类的全路径名称要和mapper.xml中的namespace相同,同时方法名称要和其中的具体功能的ID相同,如
1
2
3
4
5
package com.zavier.demo.mapper;public interface UserMapper { UserDO findById (Integer userId) ; int save (UserDO userDO) ; }
之后就可以通过之前的sqlSession来获取mapper执行查询逻辑
1 2 3 4 UserMapper mapper = session.getMapper(UserMapper.class);UserDO user = mapper.findById(1 );
原理分析
之前我们说过,mapper.xml文件是由XMLMapperBuilder来进行解析处理的,这里面其实就包含了mapper接口的处理,解析时如果有对应的接口,会进行注册到MapperRegistry中,现在看一下代码
1 2 3 4 5 6 7 8 9 10 11 12 13 14 15 16 17 18 19 20 21 22 23 24 25 26 27 28 29 30 31 32 public void parse () { if (!configuration.isResourceLoaded(resource)) { configurationElement(parser.evalNode("/mapper" )); configuration.addLoadedResource(resource); bindMapperForNamespace(); } parsePendingResultMaps(); parsePendingCacheRefs(); parsePendingStatements(); } private void bindMapperForNamespace () { String namespace = builderAssistant.getCurrentNamespace(); if (namespace != null ) { Class<?> boundType = null ; try { boundType = Resources.classForName(namespace); } catch (ClassNotFoundException e) { } if (boundType != null && !configuration.hasMapper(boundType)) { configuration.addLoadedResource("namespace:" + namespace); configuration.addMapper(boundType); } } }
1
2
3
4
5
6
7
public class Configuration { protected final MapperRegistry mapperRegistry = new MapperRegistry (this ); public <T> void addMapper (Class<T> type) { mapperRegistry.addMapper(type); } }
1
2
3
4
5
6
7
8
9
10
11
12
13
14
15
16
17
18
19
20
21
22
public class MapperRegistry { private final Configuration config; private final Map<Class<?>, MapperProxyFactory<?>> knownMappers = new HashMap <>(); public <T> void addMapper (Class<T> type) { if (type.isInterface()) { boolean loadCompleted = false ; try { knownMappers.put(type, new MapperProxyFactory <>(type)); MapperAnnotationBuilder parser = new MapperAnnotationBuilder (config, type); parser.parse(); loadCompleted = true ; } finally { if (!loadCompleted) { knownMappers.remove(type); } } } } }
解析流程之后,我们看下获取使用流程
1
2
3
4
5
6
7
8
9
10
UserMapper mapper = session.getMapper(UserMapper.class);public <T> T getMapper (Class<T> type) { return configuration.getMapper(type, this ); } public <T> T getMapper (Class<T> type, SqlSession sqlSession) { return mapperRegistry.getMapper(type, sqlSession); }
1
2
3
4
5
6
7
8
9
10
11
public class MapperRegistry { public <T> T getMapper (Class<T> type, SqlSession sqlSession) { final MapperProxyFactory<T> mapperProxyFactory = (MapperProxyFactory<T>) knownMappers.get(type); try { return mapperProxyFactory.newInstance(sqlSession); } catch (Exception e) { throw new BindingException ("Error getting mapper instance. Cause: " + e, e); } } }
1
2
3
4
5
6
7
8
9
10
11
12
13
14
15
16
17
18
public class MapperProxyFactory <T> { private final Class<T> mapperInterface; private final Map<Method, MapperProxy.MapperMethodInvoker> methodCache = new ConcurrentHashMap <>(); public MapperProxyFactory (Class<T> mapperInterface) { this .mapperInterface = mapperInterface; } protected T newInstance (MapperProxy<T> mapperProxy) { return (T) Proxy.newProxyInstance(mapperInterface.getClassLoader(), new Class [] { mapperInterface }, mapperProxy); } public T newInstance (SqlSession sqlSession) { final MapperProxy<T> mapperProxy = new MapperProxy <>(sqlSession, mapperInterface, methodCache); return newInstance(mapperProxy); } }
在调用Mapper接口的方法执行查询时,会调用到MapperProxy#invoke方法中,最终调用到MapperMethod#execute方法,对于当前的例子来说,会执行到
1 2 3 4 5 6 7 public Object execute (SqlSession sqlSession, Object[] args) { Object param = method.convertArgsToSqlCommandParam(args); return sqlSession.selectOne(command.getName(), param); }
小结一下这部分,就是在解析mapper.xml的时候,如果有对应的接口会注册到MapperRegistry中,在使用时,会创建对应的代理类,最终还是调用sqlSession来执行
Spring支持
配置使用
平时我们开发几乎都是使用Spring,所以我们希望将MyBatis相关的类都由Spring来管理,在需要的时候可是进行依赖注入,我们可以使用 mybatis-spring 这个包
1 2 3 4 5 <dependency > <groupId > org.mybatis</groupId > <artifactId > mybatis-spring</artifactId > <version > 2.0.7</version > </dependency >
如果使用xml的话配置大致如下
1 2 3 4 5 6 7 8 9 10 11 12 13 14 15 16 17 18 19 20 <bean id ="dataSource" class ="org.springframework.jdbc.datasource.DriverManagerDataSource" > <property name ="url" value ="${jdbc.url}" /> <property name ="driverClassName" value ="${jdbc.driverClassName}" /> <property name ="username" value ="${jdbc.username}" /> <property name ="password" value ="${jdbc.password}" /> </bean > <bean id ="sqlSessionFactoryBean" class ="org.mybatis.spring.SqlSessionFactoryBean" > <property name ="dataSource" ref ="dataSource" /> <property name ="mapperLocations" value ="classpath:mapper/*.xml" /> </bean > <bean class ="org.mybatis.spring.mapper.MapperScannerConfigurer" > <property name ="basePackage" value ="com.zavier.demo.mapper" /> </bean >
进行如下配置后,即可自动注入Mapper来使用
原理分析
SqlSessionFactoryBean为创建SqlSession这个Bean的工厂,我们先看下这部分实现
1
2
3
4
5
6
7
8
9
10
11
12
13
14
15
16
17
18
19
20
21
22
23
24
25
26
27
28
29
30
31
32
33
34
35
36
37
38
39
40
41
42
43
44
45
46
47
48
49
50
51
52
53
54
55
56
57
58
59
60
61
62
63
public class SqlSessionFactoryBean implements FactoryBean <SqlSessionFactory>, InitializingBean, ApplicationListener<ApplicationEvent> { public void afterPropertiesSet () throws Exception { this .sqlSessionFactory = buildSqlSessionFactory(); } protected SqlSessionFactory buildSqlSessionFactory () throws Exception { final Configuration targetConfiguration; XMLConfigBuilder xmlConfigBuilder = null ; if (this .configLocation != null ) { xmlConfigBuilder = new XMLConfigBuilder (this .configLocation.getInputStream(), null , this .configurationProperties); targetConfiguration = xmlConfigBuilder.getConfiguration(); } else { targetConfiguration = new Configuration (); } if (!isEmpty(this .plugins)) { Stream.of(this .plugins).forEach(plugin -> { targetConfiguration.addInterceptor(plugin); LOGGER.debug(() -> "Registered plugin: '" + plugin + "'" ); }); } if (!isEmpty(this .typeHandlers)) { Stream.of(this .typeHandlers).forEach(typeHandler -> { targetConfiguration.getTypeHandlerRegistry().register(typeHandler); LOGGER.debug(() -> "Registered type handler: '" + typeHandler + "'" ); }); } targetConfiguration.setEnvironment(new Environment (this .environment, this .transactionFactory == null ? new SpringManagedTransactionFactory () : this .transactionFactory, this .dataSource)); if (this .mapperLocations != null ) { for (Resource mapperLocation : this .mapperLocations) { if (mapperLocation == null ) { continue ; } try { XMLMapperBuilder xmlMapperBuilder = new XMLMapperBuilder (mapperLocation.getInputStream(), targetConfiguration, mapperLocation.toString(), targetConfiguration.getSqlFragments()); xmlMapperBuilder.parse(); } catch (Exception e) { } finally { ErrorContext.instance().reset(); } } } return this .sqlSessionFactoryBuilder.build(targetConfiguration); } }
可以看到这个SqlSessionFactoryBean也是基于MyBatis的配置进行了一下封装,需要注意的就是这个里面把事务管理器进行了替换
接下来看一下 MapperScannerConfigurer这个Bean的实现,其中会使用ClassPathMapperScanner来扫描包下面的所有接口,依次创建对应的MapperFactoryBean,其中的getObject方法会最终调用sqlSession.getMapper方法返回对应的代理类,这个地方就和之前是一样的了
1 2 3 4 public T getObject () throws Exception { return getSqlSession().getMapper(this .mapperInterface); }
MyBatis-Plus
大部分情况下,mapper.xml的文件中的一些基本查询都是必须的,每次手动写xml费事费力,这时候可以使用MyBatis-Generator来生成,但是如果我们想把这一步骤也省略的话,就可以直接使用MyBatis-Plus
配置使用
这里使用的都是针对普通的SpringMVC项目的配置,首先需要引入对应的包
1 2 3 4 5 <dependency > <groupId > com.baomidou</groupId > <artifactId > mybatis-plus</artifactId > <version > 3.5.2</version > </dependency >
配置和mybatis-spring的配置基本相同,唯一的区别就是需要替换一个sqlSessionFactory为MybatisPlus中的类,同时如果类中的字段名称与数据库字段没有一致,可以在对应字段上面添加注解使用,详细内容参考官方文档
1 2 3 <bean id ="sqlSessionFactory" class ="com.baomidou.mybatisplus.extension.spring.MybatisSqlSessionFactoryBean" > <property name ="dataSource" ref ="dataSource" /> </bean >
之后自定义的Mapper只需要继承BaseMapper即可拥有父类中的方法,不需要再手写xml文件
原理分析
既然只是替换了sqlSessionFactory,那么我们就看一下新类中做了啥
首先其替换了原来的Configuration为自己的MybatisConfiguration,其继承自Configuration
替换 SqlSessionFactoryBuilder也替换为自己的 MybatisSqlSessionFactoryBuilder
替换 MapperAnnotationBuilder 为自己的 MybatisMapperAnnotationBuilder (关键)
之前解析mapper接口的部分说到过,MapperAnnotationBuilder 是用来解析接口上面的注解用的,如
1
2
3
4
public interface BlogMapper { @Select("SELECT * FROM blog WHERE id = #{id}") Blog selectBlog (int id) ; }
将对应的信息解析为MappedStatement 并注册到Configuration
在替换为自己的方法后,可以在这一步进行一些MyBatis-Plus接口方法的解析,生成MappedStatement 后注册
1
2
3
4
5
6
7
8
9
10
11
12
13
14
15
16
17
18
19
20
21
22
23
24
public class MybatisMapperAnnotationBuilder extends MapperAnnotationBuilder { public void parse () { String resource = type.toString(); if (!configuration.isResourceLoaded(resource)) { try { if (GlobalConfigUtils.isSupperMapperChildren(configuration, type)) { parserInjector(); } } catch (IncompleteElementException e) { configuration.addIncompleteMethod(new InjectorResolver (this )); } } parsePendingMethods(); } void parserInjector () { GlobalConfigUtils.getSqlInjector(configuration).inspectInject(assistant, type); } }
1
2
3
4
5
6
7
8
9
10
11
12
13
14
15
16
17
18
19
20
21
22
23
24
25
26
27
28
29
30
31
32
33
34
35
36
37
38
39
40
41
42
43
44
45
46
47
48
public class DefaultSqlInjector extends AbstractSqlInjector { public void inspectInject (MapperBuilderAssistant builderAssistant, Class<?> mapperClass) { Class<?> modelClass = ReflectionKit.getSuperClassGenericType(mapperClass, Mapper.class, 0 ); if (modelClass != null ) { String className = mapperClass.toString(); Set<String> mapperRegistryCache = GlobalConfigUtils.getMapperRegistryCache(builderAssistant.getConfiguration()); if (!mapperRegistryCache.contains(className)) { TableInfo tableInfo = TableInfoHelper.initTableInfo(builderAssistant, modelClass); List<AbstractMethod> methodList = this .getMethodList(mapperClass, tableInfo); if (CollectionUtils.isNotEmpty(methodList)) { methodList.forEach(m -> m.inject(builderAssistant, mapperClass, modelClass, tableInfo)); } else { logger.debug(mapperClass.toString() + ", No effective injection method was found." ); } mapperRegistryCache.add(className); } } } @Override public List<AbstractMethod> getMethodList (Class<?> mapperClass, TableInfo tableInfo) { Stream.Builder<AbstractMethod> builder = Stream.<AbstractMethod>builder() .add(new Insert ()) .add(new Delete ()) .add(new DeleteByMap ()) .add(new Update ()) .add(new SelectByMap ()) .add(new SelectCount ()) .add(new SelectMaps ()) .add(new SelectMapsPage ()) .add(new SelectObjs ()) .add(new SelectList ()) .add(new SelectPage ()); if (tableInfo.havePK()) { builder.add(new DeleteById ()) .add(new DeleteBatchByIds ()) .add(new UpdateById ()) .add(new SelectById ()) .add(new SelectBatchByIds ()); } else { } return builder.build().collect(toList()); } }
我们就以SelectList 为例看一下是如何构造MappedStatement并注册到Configuration中的
1
2
3
4
5
6
7
8
9
10
11
12
13
14
15
16
17
public class SelectList extends AbstractMethod { public SelectList () { super (SqlMethod.SELECT_LIST.getMethod()); } @Override public MappedStatement injectMappedStatement (Class<?> mapperClass, Class<?> modelClass, TableInfo tableInfo) { SqlMethod sqlMethod = SqlMethod.SELECT_LIST; String sql = String.format(sqlMethod.getSql(), sqlFirst(), sqlSelectColumns(tableInfo, true ), tableInfo.getTableName(), sqlWhereEntityWrapper(true , tableInfo), sqlOrderBy(tableInfo), sqlComment()); SqlSource sqlSource = languageDriver.createSqlSource(configuration, sql, modelClass); return this .addSelectMappedStatementForTable(mapperClass, getMethod(sqlMethod), sqlSource, tableInfo); } }
小结一下,就是利用自定义的MybatisMapperAnnotationBuilder ,将固定一些方法的信息构造MappedStatement并添加到Configuration中,这样后续就可以直接从Configuration中获取使用
不过这种方式替换了太多MyBatis的类,其中还有很多复制的代码然后进行修改,有种魔改的感觉~~
当然,MyBatis-Plus也不仅仅只有这一个功能,其他还有包括逻辑删除、自动填充、Sql注入器等功能,具体可以查看对应的文档
MyBatis-Mapper
除了MyBatis-Plus这种方式,还有一个包也可以实现类似的功能-MyBatis-Mapper ,这种方式无需任何额外的配置,使用的MyBatis本身的扩展功能,不过只能支持MyBatis 3.5.1及以上版本
1 2 3 4 5 6 <dependency > <groupId > io.mybatis</groupId > <artifactId > mybatis-mapper</artifactId > <version > 1.2.2</version > </dependency >
配置使用
1 2 3 4 5 6 7 8 9 10 11 @Table("t_user") @Data public class UserDO { @Column(value = "id", id = true) private Integer id; @Column("user_name") private String userName; @Column("user_age") private Integer userAge; }
其次Mapper需要继承mybatis-mapper中的Mapper接口,这样就可以直接使用父接口中的方法了
1
2
public interface UserMapper extends Mapper <UserDO, Integer> {}
使用代码如下
1 Optional<UserDO> userDO = userMapper.selectByPrimaryKey(1 );
原理分析
我们先看下mybatis-mapper中的Mapper接口
1 2 3 4 5 @Lang(Caching.class) @SelectProvider(type = EntityProvider.class, method = "selectByPrimaryKey") Optional<T> selectByPrimaryKey (I id) ;
1 2 3 4 5 6 7 8 9 10 11 public static String selectByPrimaryKey (ProviderContext providerContext) { return SqlScript.caching(providerContext, new SqlScript () { @Override public String getSql (EntityTable entity) { return "SELECT " + entity.baseColumnAsPropertyList() + " FROM " + entity.table() + where(() -> entity.idColumns().stream().map(EntityColumn::columnEqualsProperty).collect(Collectors.joining(" AND " ))); } }); }
这部分的处理解析部分在 MapperAnnotationBuilder(处理Mapper接口中的注解信息) 中,其中会根据对应注解中的方法动态生成sql,创建MappedStatement并注册到Configuration中
1
2
3
4
5
6
7
public class MapperAnnotationBuilder { private SqlSource buildSqlSource (Annotation annotation, Class<?> parameterType, LanguageDriver languageDriver, Method method) { return new ProviderSqlSource (assistant.getConfiguration(), annotation, type, method); } }
1
2
3
4
5
6
7
8
9
10
11
12
13
14
15
16
17
18
19
20
21
22
23
public class ProviderSqlSource implements SqlSource { public BoundSql getBoundSql (Object parameterObject) { SqlSource sqlSource = createSqlSource(parameterObject); return sqlSource.getBoundSql(parameterObject); } private SqlSource createSqlSource (Object parameterObject) { String sql = invokeProviderMethod(parameterObject); Class<?> parameterType = parameterObject == null ? Object.class : parameterObject.getClass(); return languageDriver.createSqlSource(configuration, sql, parameterType); } private String invokeProviderMethod (Object... args) throws Exception { Object targetObject = null ; if (!Modifier.isStatic(providerMethod.getModifiers())) { targetObject = providerType.getDeclaredConstructor().newInstance(); } CharSequence sql = (CharSequence) providerMethod.invoke(targetObject, args); return sql != null ? sql.toString() : null ; } }
知道了原理之后,我们也可以自定义Mapper,并且自己实现注解中的类和方法来动态生成SQL
总之,如果只是追求不写xml文件或者全自动,可以考虑下直接使用 JPA
以上内容没有包含Spring-Boot-Starter系列用法,原理基本都是一样的,只是对应starter包帮我们把手动配置的部分,自动进行了配置而已